by Michael O'Neill | Oct 11, 2008 | Uncategorized
I have a problem with my docs. In fact, I have many many problems with my docs…but in the interests of brevity (this statement will certainly be a joke by the time we are done), I’m going to limit this article to just one of the problems with my docs: how I cope with an absurd amount of conditions in FrameMaker.
Before we get into the nitty gritty, however, I’ll cover a few salient details.
- I use FrameMaker 6.x for all my docs. Yes, I know it is old. Yes, I know more recent versions of FrameMaker have dramatically improved conditions… but some time ago I was told that I was not allowed to upgrade to a more recent version of FrameMaker. Rather than fight that system, I set out to find a better way of coping with conditions in FrameMaker 6.x.
- I build both single source and shared source for a sizable percentage of content. This is the only reasonable way for one person (me!) to even give the appearance of being able to manage, update, and work in so many documents across so many product lines. Because the terms “single source” and “shared source” are not always used consistently, I’ll digress for a moment to define them in the context of this article:
- Single-sourcing: Using one source document for producing
output in different formats. Of course in my case, we are
talking about hundreds of source files, any one of which contains
content used in both PDF and WebHelp output.
- Shared-sourcing: Using one source document for producing output for different product documents with overlapping features and functionality. As in the case of “single-sourcing” above, I am really talking about hundreds of source files here, any one of which can contain content shared amongst multiple product lines.
The only way that it is possible for us (and by “us”, I really mean “me”) to manage this amount of documentation is by extensive use of conditional text. It quickly gets out of hand.
To avoid identifying the guilty, let’s explain the problem by hypothetical example. Let’s say I work for Widget Co, and we make all sorts of widgets. Our documentation deliverables for each widget consists of a mix of PDF and Online Help files. Furthermore, though each type of widget we sell shares a core amount of standard functionality, each also has a unique set of features and functionality. Based on this circumstance, I have a plethora of conditions in my source documents. I think I’m approaching 60 distinct ones. Maybe more. All sorts of crazy algebra goes into it. Unique conditions for Product A online, Product A PDF, Product B online, Product B PDF, Product A if used in conjunction with Product B (online and and PDF), etc etc etc. Believe me, the number of conditions grows very fast in my situation…but it works. Sort of.
The weak point in this approach is the author. It was simply taking me too long to apply and change all the conditions when I had to edit or write new content. Sure, the ol’ CTRL+4 trick allows you to “quickly” apply conditions in FrameMaker…but in this case, “quickly” is a relative word, and after a week of doing it that way, my hands were contorted into claws from the repetition and pushing myself to do it faster and faster.
A further complication arose out of the sheer number of conditions I used: because we have so many conditions, I had to make the names of the conditions meaningful so that after a 3 month hiatus on a given document, I could look at the condition names and figure out what they were intended to do and how they were to be used. This meant that my condition names were long and descriptive. This, in turn, meant that it took a long time to apply a condition to a piece of text simply because of the length of the condition name I had to type. Believe me, I tried using short names and keeping a reference index that explained what each condition did…but that quickly resulted in a huge mess of incomprehensible condition tags and I was spending a long time checking and double-checking what condition “A1” was supposed to do in comparison to conditions “A2-A45”. You probably catch my drift…
So, I went back to finding a method that allowed me to keep my condition names self-explanatory, yet would not impose a time burden on the author (me!) when applying them. Enter XKeys and AutoIT.
XKeys
XKeys is a special type of “macro keyboard” produced by P.I. Engineering. It’s basically a blank keyboard with no labels on the keys. You can program the keys to do anything you want using the scripting software that comes with the keyboard. In fact, you can even assign a given key to a specific .exe file so that the file is executed when the key is pressed. PIEngineering (the makers of the XKeys keyboards) sends some nifty stickers that you can use to label each key. To the right is a picture of the XKeys keyboard that I use.
AutoIT
AutoIT is a Visual Basic-like scripting language that allows you to automate interaction with Windows and Windows software. It’s free, and pretty powerful (if you can get over the stigma of working with something like Visual Basic in a software engineering group) for automating things in the Windows environment.
From the AutoIT website:
AutoIt v3 is a freeware BASIC-like scripting language designed for automating the Windows GUI and general scripting. It uses a combination of simulated keystrokes, mouse movement and window/control manipulation in order to automate tasks in a way not possible or reliable with other languages (e.g. VBScript and SendKeys). AutoIt is also very small, self-contained and will run on all versions of Windows out-of-the-box with no annoying “runtimes” required!
AutoIt was initially designed for PC “roll out” situations to reliably automate and configure thousands of PCs. Over time it has become a powerful language that supports complex expressions, user functions, loops and everything else that veteran scripters would expect.
XKeys + AutoIT = Nirvana (or at least a tangible improvement)
Once I got my XKeys keyboard I set about trying to make it useful. After poking around with their scripting interface a bit, I muttered a few choice expletives and gave up on it. Don’t get me wrong, their scripting language and interface (MacroKeys) may be the cat’s meow, and will allow you to script a lot of things without having to “program”, but it just seemed to keep getting in my way. Perhaps it was because I wanted to approach the problem programmatically, but I didn’t have the time budget to really dive in and learn MacroKeys. After all, I was already fairly confident AutoIT could do what I wanted, and I had a rough idea of the code it would take to do it. I just had to figure out how to tie the two together.
The solution is patently obvious, but it took me some trial and error. (Hey, I’m not a programmer, engineer, or one to quickly apprehend the obvious in most circumstances.) The trick was to write my script in AutoIT, compile it to an .exe file, and assign the .exe file to one of the keys on the XKeys keyboard. There’s one more thing I wanted to do: I had to make sure that the script would only run when FrameMaker was active. After all, I didn’t want to, for example, send a stream of keypresses to PhotoShop if I pressed an XKeys key accidentally. Since I knew that this was easy to do in AutoIT, I set about to write my first AutoIT script to apply a specifc condition to a FrameMaker document. Here’s what the AutoIT code looks like for one condition (feel free to copy and paste into AutoIT to try it out. Mind you, you’ll have to change the name of the actual condition used in the macro to suit your needs.):
#include-once
#cs ------------------------------------------------------------------
AutoIt Version: 3.1.1.0
Author:         michael
Script Function:
Template AutoIt script.

Script Name:
     WWHiPlash

Version:
     0.11
#ce -----------------------------------------------------------------------
#region --- Standard initialization stuff ---
#include

#region --- ScriptWriter generated code Start ---
Opt("WinWaitDelay",100)
Opt("WinTitleMatchMode",4)
Opt("WinDetectHiddenText",1)
Opt("MouseCoordMode",0)
#endregion --- Standard initialization stuff ---


If WinActive("Adobe FrameMaker+SGML") Then
; (above)Macro will only continue executing if FrameMaker is currently
; active.  The text within quotes will have to be changed
; to match your current version of FrameMaker.  (Above is
; for FrameMaker 6 + SGML.  Look in the FrameMaker Window blue-bar or use
; the AU3Info tool that comes with AutoIT to see what text
; you need.
     Send("{CTRLDOWN}")
     Send("4")
     Send("{CTRLUP}")
     Send("some_condition_name")
  ; Text within quotes is the name of the condition
  ; that will be applied.  Change it to fit your
  ; needs.
  Send("{ENTER}")
EndIf
Mind you, you can try out this AutoIT code without actually having an XKeys keyboard…you’ll just have to run the .exe file manually. The problem with this is that it is likely that it won’t do anything because as written, the script checks to make sure that FrameMaker is currently active. If it isn’t, it won’t run. So if you want to try out the script without an XKeys keyboard, you can tweak the AutoIT code to automatically activate the FrameMaker window before running the rest of the macro. The code would look like this:
#include-once
#cs ------------------------------------------------------------------
AutoIt Version: 3.1.1.0
Author:         michael
Script Function:
Template AutoIt script.

Script Name:
     WWHiPlash

Version:
     0.11
#ce -----------------------------------------------------------------------
#region --- Standard initialization stuff ---
#include

#region --- ScriptWriter generated code Start ---
Opt("WinWaitDelay",100)
Opt("WinTitleMatchMode",4)
Opt("WinDetectHiddenText",1)
Opt("MouseCoordMode",0)
#endregion --- Standard initialization stuff ---


WinActivate("Adobe FrameMaker+SGML")
WinWaitActive("Adobe FrameMaker+SGML")
If WinActive("Adobe FrameMaker+SGML") Then
; (above)Macro will only continue executing if FrameMaker is currently
; active.  The text within quotes will have to be changed
; to match your current version of FrameMaker.  (Above is
; for FrameMaker 6 + SGML.  Look in the FrameMaker Window blue-bar or use
; the AU3Info tool that comes with AutoIT to see what text
; you need.
     Send("{CTRLDOWN}")
     Send("4")
     Send("{CTRLUP}")
     Send("some_condition_name")
  ; Text within quotes is the name of the condition
  ; that will be applied.  Change it to fit your
  ; needs.
  Send("{ENTER}")
EndIf
Implementation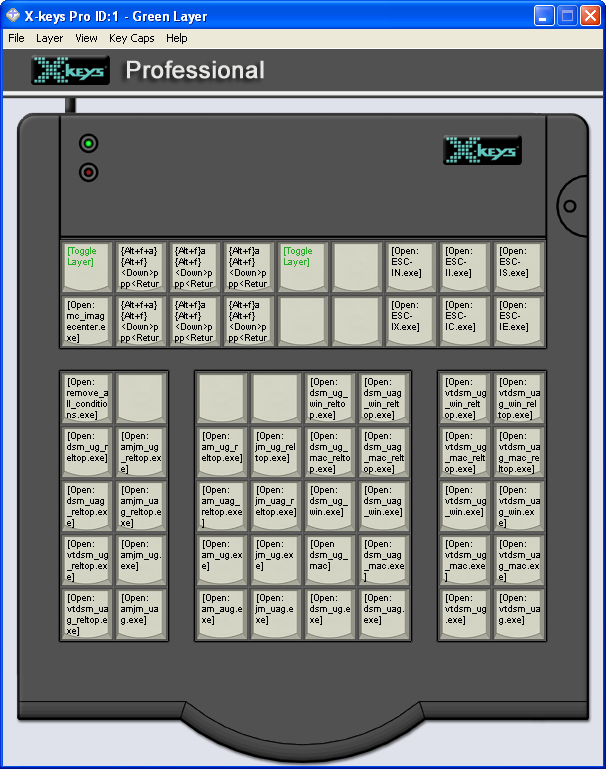
Once I got the first condition working, the rest was easy:
- Make a new script in AutoIT for each of my remaining conditions.
- Compile each script to an .exe file
- Assign each script executable to the appropriate XKeys keyboard key.
You can see the assignment of all my condition macros to the XKeys keyboard in the image to the right. Note that this screenshot is of the XKeys programming interface. To assign an executable file to a particular key, you just drag the file from Windows Explorer and drop it on the key of your choice. It doesn’t get much simpler than that.
Screencast
If you are having trouble understanding how effective using an XKeys keyboard with AutoIT can be, I made the following screencast showing how I can quickly manipulate a lot of conditions quickly.
Unfortunately, the video doesn’t quite do the speed justice. I don’t know whether I just had too many applications open or what, but my system was performing sluggishly all morning and the screencast recording software didn’t improve things. Still, the video should give you a rough idea of what I’m talking about. When you see conditions being applied in the video, keep in mind that they are being applied and cleared by pressing specific keys on the XKeys keyboard.
Resources
- Downloading AutoIT: Follow the link to the download page for AutoIT. I recommend that you download both the “AutoIT Full Installation” package and the additional “AutoIT Script Editor”. The AutoIT Script Editor is a customized version of SciTE that provides a lot of extra features for simplifying scripting in AutoIT.
- Purchasing XKeys: Follow the link to P.I. Engineering’s XKeys product pages. Search for the model you want, and follow the purchase instructions. Though XKeys products are apparently available in several retailers, I ordered mine through the website and recieved it a few days later via UPS. Specific purchasing instructions are available on this page.
by Michael O'Neill | Feb 16, 2008 | Uncategorized
It is generally accepted that FrameMaker is one of the best tools for reliably authoring long documents. In this category of software, Microsoft Word isn’t even a contender. Yet for all FrameMaker’s many strengths, it still suffers from some rather annoying problems that can really throw a spanner into the works that is your writing. One of these FrameMaker problems is the size of some of its dialog windows, especially those used for selecting conditional text settings.
The main problem with these windows is that they are too small to show the full name of defined conditions. To add insult to injury, these dialog windows are not even resizable. What this means, in all practicality, is that if you have multiple conditions that share the first few characters, you will not be able to differentiate the conditions using Frame’s dialog windows.
For example, the documents I work on have gone through several technical writers, share content for a variety of outputs (PDF and online Help) and between application families. In an effort to reign in the conditional text chaos, we’ve standardized our conditional text names. Now, all conditional text names use the following convention “mc_f__”. Some typical conditions would be:
- mc_f_app1_ug
- mc_f_app1_ug_mac
- mc_f_app1_ug_win
- mc_f_app1_uag
- mc_f_app1_uag_mac
- mc_f_app1_uag_win
- mc_f_app2
Granted, this convention is less than ideal for a number of reasons, but it was a big step forward from the hodgepodge of different conditions used previously.
Below is a screen capture of the Show/Hide Conditional Text dialog used to select which conditions to show in a document:
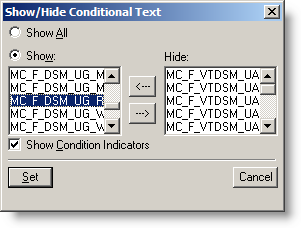
As you can see, this dialog is worse than useless…it is downright frustrating to use. The cells for Show and Hide just don’t provide enough horizontal space to show the full names of the conditions. Fortunately, with a little resourcefulness and careful planning, you can resize these windows to just about any size that works for you. All you need is a little application called Resource Hacker and some patience.
Fixing FrameMaker with Resource Hacker
The first thing you’ll need to do is to download Resource Hacker. This free tool is available from many sites offering freeware for download. The link at the bottom is just one such site.
Resource Hacker allows you to edit various program resource files (like .dll files) that contain the properties for many of the dialog (and other) windows used in an application. Fortunately for us, the FrameMaker’s conditional dialog windows are housed in one such DLL.
Before editing the DLL in question, you first need to find it and make a safe backup copy of it that you can revert to in case of unforeseen problems. Mind you, I’ve been using a modified version of this DLL for quite some time and have yet to encounter any problem. . .but as with any such modification, your mileage may vary and there is no guarantee that such “hacks” won’t result in a core meltdown of your computer, an increase in global warming, the downfall of western civilization, a rise in communism, inflation, etc… Be warned.
So now that you’ve been warned, here’s the info you need to get started. The file you want is called fmdlg.dll and it is usually found in the following location:
C:\Program Files\Adobe\FrameMaker+SGML6.0\fminit\fmdlg.dll
Once you’ve made a backup copy of it, fire up Resource Hacker. Once it opens, navigate to and open the abovementioned fmdlg.dll file. You’ll see that Resource Hacker utilizes the familiar tree/properties presentation scheme where the navigation tree on the left side of the screen allows you to choose between the various resources included in the DLL file while the right side details pane presents information on the selected resource.
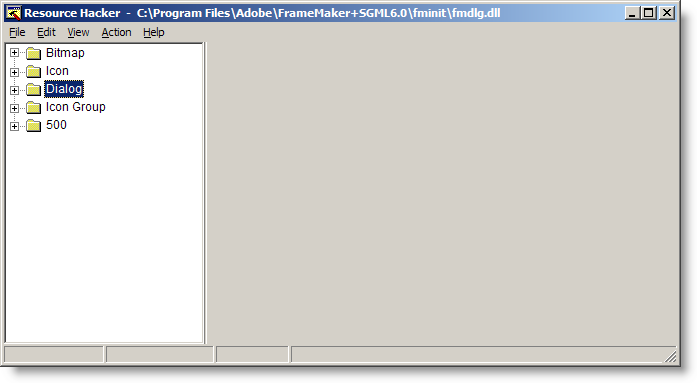
Expand the “Dialog” root and look for the COND_TEXT and COND_VISIBILITY branches. These are the two branches that contain the resources for the FrameMaker dialogs for applying conditional text and for showing and hiding conditional text.
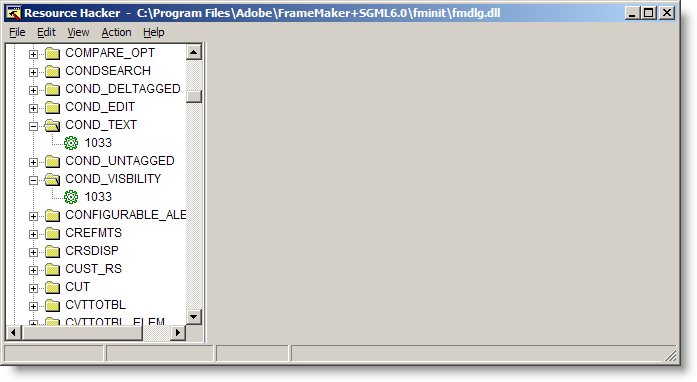
Expanding the COND_TEXT and COND_VISIBILITY branches reveals a resource numbered “1033” in each. I don’t know what this number signifies. Perhaps it is the answer to life, the universe, and everything. Perhaps it is the number of angels that can dance on the head of a pin. Or perhaps it has some other more mundane significance. In any case, the number isn’t important. The fact is that when you click the number, the details for the corresponding dialog window appear in the details pane of Resource Hacker and an editable preview of the selected dialog window also appears below.
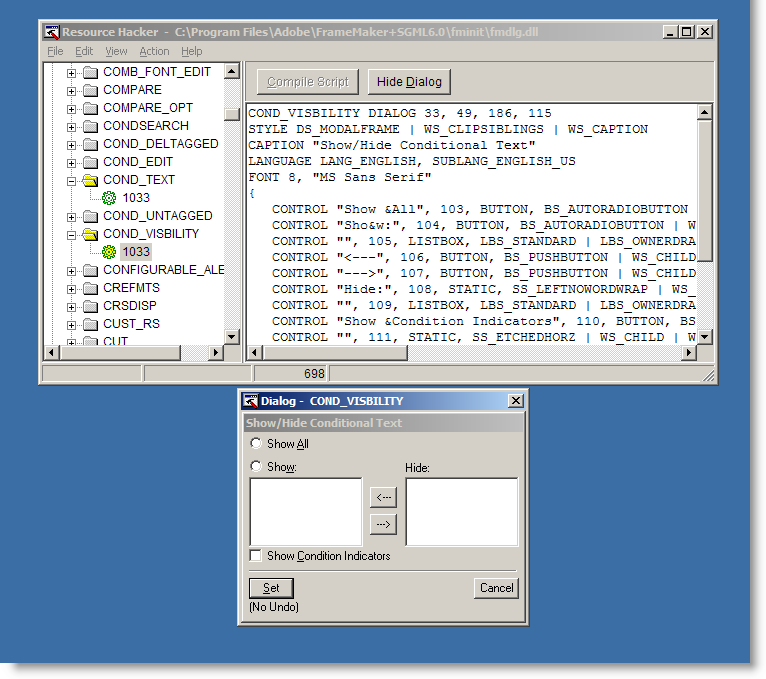
Lets edit the Show/Hide Conditional Text window first, since it obscures more of the conditional tags and (AFAIK) there is no hotkey combination for revealing and hiding conditions equivalent to those used to apply and remove conditions. Without full visibility of your conditions, this window is indeed useless.
The first thing you’ll need to do, if you haven’t already, is click the “1033” resource in the “COND_VISIBILITY” branch of the Dialogs root in Resource Hacker. The result should be nearly identical to the screen capture above: the properties of the dialog will be displayed in the details pane of resource hacker and an editable preview of the dialog will appear at the bottom. (If you don’t immediately notice the preview, check the lower right corner of your screen. For some reason on my machine, this is the default preview location for resources opened in Resource Hacker.)
You can resize the window either by dragging and moving the objects in the preview, or by editing the text in the details view of resource hacker. I’m going to leave it up to you which way you do it. Editing the text is faster for an expert, but if you are new to Resource Hacker, you’ll probably want to expirament by resizing in the preview. Just one word of note, when you select an object or control in the preview, a red asterisk will appear next to the object’s information line in the details pane. This will allow you to correlate which controls correspond to what information in the preview pane. Change a control (or window’s) dimensions in the preview pane will change the information in the control or window’s infromation in the preview pane correspondingly. Conversely, changing values directly in the details pane does not immediately update the preview. To see your changed values, you’ll need to click the Compile Script button atop the details pane.
After some hacking, here is what I achieved: A window roughly twice as large in both the horizontal and vertical directions As you can see, I’ve resized the Show and Hide list boxes proportionally.
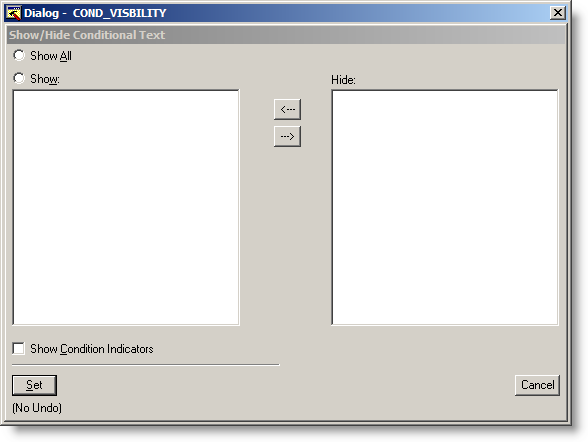
Once you’ve finished mucking around with your window, it’s time to save your changes back to the fmdlg.dll file and test them out in FrameMaker. This is done by clicking Save in the file menu of Resource Hacker.
Now, the result in FrameMaker:
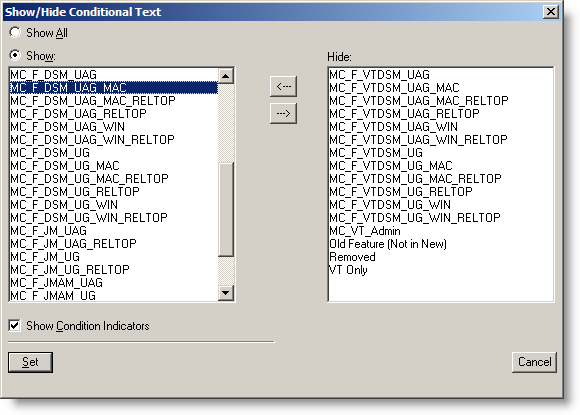
Ahhh… much better. Finally, I can see the full text of each condition. This makes selecting the which conditional text to show and hide much easier.
By following the same principals, I can resize the Conditional Text window as well:
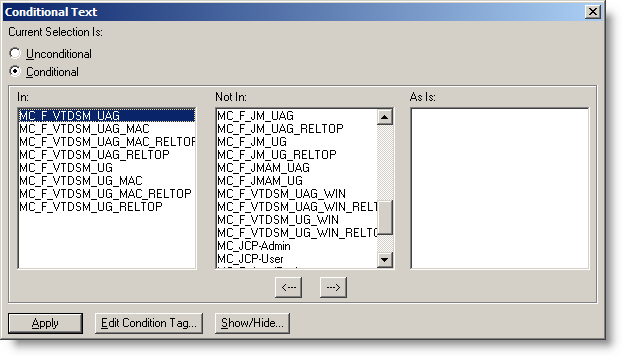
If you like how I’ve resized these windows, you can achieve the same results by replacing the details text in Resource Hacker with the appropriate text below, clicking Compile Script, and saving the results.
Conditional Text Dialog Settings
COND_TEXT DIALOG 33, 49, 400, 194
STYLE DS_MODALFRAME | WS_CLIPSIBLINGS | WS_CAPTION
CAPTION "Conditional Text"
LANGUAGE LANG_ENGLISH, SUBLANG_ENGLISH_US
FONT 8, "MS Sans Serif"
{
CONTROL "Current Selection Is:", 104, STATIC, SS_LEFTNOWORDWRAP | WS_CHILD | WS_VISIBLE | WS_GROUP, 3, 2, 188, 9
CONTROL "&Unconditional", 105, BUTTON, BS_AUTORADIOBUTTON | WS_CHILD | WS_VISIBLE | WS_GROUP | WS_TABSTOP, 3, 15, 56, 10
CONTROL "&Conditional", 106, BUTTON, BS_AUTORADIOBUTTON | WS_CHILD | WS_VISIBLE, 3, 26, 48, 10
CONTROL "", 107, STATIC, SS_ETCHEDFRAME | WS_CHILD | WS_VISIBLE | WS_GROUP, 3, 39, 393, 135
CONTROL "In:", 108, STATIC, SS_LEFTNOWORDWRAP | WS_CHILD | WS_VISIBLE | WS_GROUP, 9, 42, 56, 9
CONTROL "", 109, LISTBOX, LBS_STANDARD | LBS_OWNERDRAWFIXED | LBS_HASSTRINGS | LBS_NOINTEGRALHEIGHT | WS_CHILD | WS_VISIBLE | WS_GROUP | WS_TABSTOP, 9, 52, 120, 100
CONTROL "Not In:", 110, STATIC, SS_LEFTNOWORDWRAP | WS_CHILD | WS_VISIBLE | WS_GROUP, 141, 42, 56, 9
CONTROL "", 111, LISTBOX, LBS_STANDARD | LBS_OWNERDRAWFIXED | LBS_HASSTRINGS | LBS_NOINTEGRALHEIGHT | WS_CHILD | WS_VISIBLE | WS_GROUP | WS_TABSTOP, 141, 52, 120, 100
CONTROL "As Is:", 112, STATIC, SS_LEFTNOWORDWRAP | WS_CHILD | WS_VISIBLE | WS_GROUP, 271, 42, 56, 9
CONTROL "", 113, LISTBOX, LBS_STANDARD | LBS_OWNERDRAWFIXED | LBS_HASSTRINGS | LBS_NOINTEGRALHEIGHT | WS_CHILD | WS_VISIBLE | WS_GROUP | WS_TABSTOP, 271, 52, 120, 100
CONTROL "", 115, BUTTON, BS_PUSHBUTTON | WS_CHILD | WS_VISIBLE | WS_GROUP | WS_TABSTOP, 211, 157, 18, 13
CONTROL "&Apply", 100, BUTTON, BS_DEFPUSHBUTTON | WS_CHILD | WS_VISIBLE | WS_GROUP | WS_TABSTOP, 3, 179, 50, 13
CONTROL "&Edit Condition Tag...", 101, BUTTON, BS_PUSHBUTTON | WS_CHILD | WS_VISIBLE | WS_GROUP | WS_TABSTOP, 61, 179, 72, 13
CONTROL "&Show/Hide...", 102, BUTTON, BS_PUSHBUTTON | WS_CHILD | WS_VISIBLE | WS_GROUP | WS_TABSTOP, 141, 179, 50, 13
CONTROL " ", 103, STATIC, SS_LEFTNOWORDWRAP | WS_CHILD | WS_VISIBLE | WS_GROUP, 1333, 1231, 0, 0
CONTROL "Conditional Text", 116, STATIC, SS_LEFTNOWORDWRAP | WS_CHILD | WS_VISIBLE | WS_DISABLED | WS_GROUP, 0, 0, 0, 0
}
Show/Hide Conditional Text Dialog Settings
COND_VISBILITY DIALOG 33, 49, 372, 230
STYLE DS_MODALFRAME | WS_CLIPSIBLINGS | WS_CAPTION
CAPTION "Show/Hide Conditional Text"
LANGUAGE LANG_ENGLISH, SUBLANG_ENGLISH_US
FONT 8, "MS Sans Serif"
{
CONTROL "Show &All", 103, BUTTON, BS_AUTORADIOBUTTON | WS_CHILD | WS_VISIBLE | WS_GROUP | WS_TABSTOP, 3, 2, 180, 10
CONTROL "Sho&w:", 104, BUTTON, BS_AUTORADIOBUTTON | WS_CHILD | WS_VISIBLE, 3, 16, 33, 10
CONTROL "", 105, LISTBOX, LBS_STANDARD | LBS_OWNERDRAWFIXED | LBS_HASSTRINGS | LBS_NOINTEGRALHEIGHT | WS_CHILD | WS_VISIBLE | WS_GROUP | WS_TABSTOP, 3, 27, 152, 146
CONTROL "", 107, BUTTON, BS_PUSHBUTTON | WS_CHILD | WS_VISIBLE | WS_GROUP | WS_TABSTOP, 178, 50, 18, 13
CONTROL "Hide:", 108, STATIC, SS_LEFTNOWORDWRAP | WS_CHILD | WS_VISIBLE | WS_GROUP, 216, 17, 18, 9
CONTROL "", 109, LISTBOX, LBS_STANDARD | LBS_OWNERDRAWFIXED | LBS_HASSTRINGS | LBS_NOINTEGRALHEIGHT | WS_CHILD | WS_VISIBLE | WS_GROUP | WS_TABSTOP, 216, 27, 152, 146
CONTROL "Show &Condition Indicators", 110, BUTTON, BS_AUTOCHECKBOX | WS_CHILD | WS_VISIBLE | WS_GROUP | WS_TABSTOP, 3, 182, 180, 10
CONTROL "", 111, STATIC, SS_ETCHEDHORZ | WS_CHILD | WS_VISIBLE | WS_GROUP, 3, 196, 179, 1
CONTROL "&Set", 100, BUTTON, BS_DEFPUSHBUTTON | WS_CHILD | WS_VISIBLE | WS_GROUP | WS_TABSTOP, 3, 203, 30, 13
CONTROL "Cancel", 101, BUTTON, BS_PUSHBUTTON | WS_CHILD | WS_VISIBLE | WS_GROUP | WS_TABSTOP, 339, 203, 30, 13
CONTROL "(No Undo)", 113, STATIC, SS_LEFTNOWORDWRAP | WS_CHILD | WS_VISIBLE | WS_GROUP, 3, 219, 34, 9
CONTROL "&Help", 112, STATIC, SS_LEFTNOWORDWRAP | WS_CHILD | WS_VISIBLE | WS_GROUP, 1333, 1231, 0, 0
CONTROL "Show/Hide Conditional Text", 102, STATIC, SS_LEFTNOWORDWRAP | WS_CHILD | WS_VISIBLE | WS_DISABLED | WS_GROUP, 0, 0, 0, 0
}
Resources Mentioned in this Article


